H.265, GIF or AV1 in Blender, Render Pausing and Parallel Rendering
I use Blender for everything when making a video, from 3D rendering, through compositing and masking to the final cut and sound design. I need a way to do all that which results in a video that I can store somewhere and upload on YouTube. Here I am going to describe quickly my favorite way of the final rendering stage. We’ll also need the almighty tool called ffmpeg. If you work with video often, you’ll definitely end up using ffmpeg anyway so don’t be afraid of it. All you need to learn is how to use a terminal or command line.
Video preview
How to preview a for example 4K video in Blender video sequence editor (VSE)? If you have good enough machine, then you might be able to actually simply play it by hitting the play button. In my case I sometimes see some serious lags. How to boost this preview? Proxy!
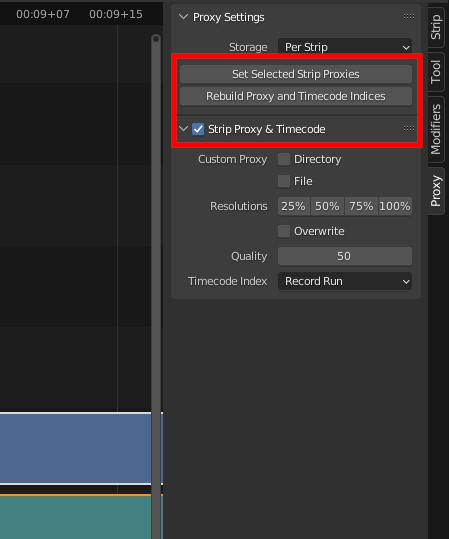
- Select the video strip, go to panel on the right and select Proxy tab
- Tick the Strip Proxy & Timecode box to enable the function
- Click the Set Selected Strip Proxies and choose the quality
- Click the next button to rebuild the proxies and wait
- Go up to the preview panel (reveal it by clicking on the preview and pressing n)
- Select the proxy render size according to the one you’ve built
- Play the video
The performance should have improved after this and the video shall play smoothly form now on.
Pausing the rendering
Sometimes you might want to render a really huge video but you don’t want to let your computer running for hours. Let’s say you want to continue the render the next day. The function is not supported originally in Blender. There are two ways of how to achieve this. First one is to render only a part of the video (even stopping it by hitting Esc in the middle of the rendering might work) and then the rest. After that concatenate it by using ffmpeg like this:
Create a text file with the list of the videos like:
file '/path/epicVideo.mkv'
file '/path/amazingVideo.mkv'

And then use the following command:
ffmpeg -f concat -safe 0 -i videoList.txt -c copy outputVideo
You type these commands in the Linux terminal or Windows command prompt. Of course, first one has to install FFmpeg in the system. There are many tutorials for that all over the internet.
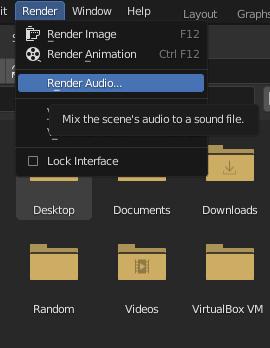
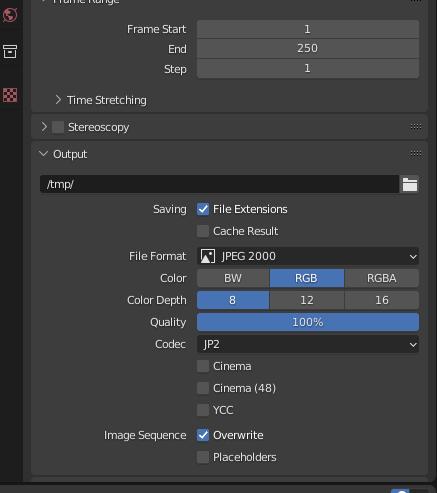
Second one is what I use because of the option to actually re-render the wrong parts on the frames level. Sometimes I do some mistakes that I notice when watching the final rendered video. What about fixing it and only rendering those wrong frames? Sure, let’s render the video as a sequence of images. There are two disadvantages though. First, you need a lot of free space on your disk. Second, the encoding in ffmpeg will also take some time. So what I do is that I set the JPEG 2000 output and let the video render (can also be PNG or even EXR). I also export the sound alone by clicking on the Render menu at the top and hit Render Audio and mixdown the standalone sound into a separate file.
Then I take the sequence and audio track and turn it into a video by doing this:
ffmpeg -r inputFramerate -i name%0Digitsd.jp2 -i audioTrack -c:v format -crf quality -pix_fmt yuv420p -c:a audioFormat output

(pix_fmt is used according to the YT guidelines and also because the jp2 sometimes caused me some trouble without specifying the pixel format)

Example:
ffmpeg -r 25 -i video%04d.jp2 -i music.flac -c:v libx264 -crf 24 -pix_fmt yuv420p -c:a aac output.mp4

(%04 means that there are 4 digits of the frame number in the image sequence names exported from Blender)
One can stop the render anytime, having rendered only a portion of the frames. Also, when fixing a part of the video, you can simply set the start and end frame in Blender so that only the broken part is re-rendered. When the video is cut and all the following frames move, then the easiest and fastest option is to rename the affected frames with the correct numbering. File explorers usually allow bulk renaming of multiple files at once.
HEVC aka H.265 etc.
OK so what if just want to export a H.265 file? Why would I even want that? The answer is simple, to save the space. With H.265 you can get significantly smaller files while preserving the quality. Your video will look like your favorite H.264 or whatever format you like to use but its size will be much smaller. Read some information about ffmpeg and H.265 setting in ffmpeg documentation if you feel like experimenting. I personally really like H.265 and use it for all my videos now. So the way to do it is: render the video from Blender in a lossless format (or a very low compression level) and then encode it with ffmpeg. I always use the JPEG 2000 with H.265. So I export the video in the same way as described above and then I use a very similar command:
ffmpeg -r 25 -i video%04d.jp2 -i music.flac -c:v libx265 -crf 24 -pix_fmt yuv420p -c:a aac output.mp4
And that’s it! One more thing. I used to render videos in H.264 directly from Blender but when using the footage from my AEE Magicam S71 I’ve had problems with a strange pixelating and flickering and box artifacts in the video. The cause was GOP (sequence of pseudo-frames that are being computed using the full frames at the borders of this group of pictures). I’ve played with the bitrate and different GOP values but nothing was good enough. However, when I tried to export the image sequence and encode the video with ffmpeg, the problems was solved.
Of course, ffmpeg offers many other formats. You can encode the video in the modern AV1 codec or even create a gif:
ffmpeg -r 25 -i video%04d.jp2 -i music.flac -c:v libaom-av1 -crf 28 -pix_fmt yuv420p -cpu-used 4 -c:a aac output.mp4
ffmpeg -r 25 -i video%04d.jp2 output.gif
I have also created a script/addon which connects an external ffmpeg with Blender and unlocks all the formats directly in Blender rendering. Here it is!
Multi-threaded parallel rendering acceleration
Blender renders the video frame by frame. Sometimes, if your PC is powerful enough, you'd want to use multiple threads and render the video faster. This is especially useful in VSE where not much of the CPU or GPU performance is needed. There are some addons solving this problem too. What they do, and what you can do manually, is to run multiple instances of Blender with different frame ranges of the same project. Let's split one render task into two parallel ones. Open Blender project, set the end frame to the half of the whole length and render animation. Then open a new Blender instance of the same project (while the first one is still rendering), set the start frame to the end frame of the previous one plus one and render. In this way, you are rendering both halves at the same time which might speed up the process if your PC can handle that. You can run even more instances. And then, if you have rendered videos or frames, just merge them in one final video as described above. I made a simple Linux bash script that I run to render in 4 threads and I use commandline rendering to specify only a portion of the video to render in one process (no need to edit the range in Blender UI or save it in the project):
blender -b myBestMovie.blend -s 0 -e 100 -a &
blender -b myBestMovie.blend -s 101 -e 200 -a &
...
wait
This tutorial was written for Blender 3.1. If you think it’s outdated, leave a comment and I’ll update it.
Published:Keywords: ffmpeg,rendering,video editor,codec,film making
#video #videocompression #filmmaking #videoediting #editingvideo #h265 #vvc #blender #blendertutorial
Privacy Terms